
- إنضم
- 23 فبراير 2009
- المشاركات
- 7,489
- مستوى التفاعل
- 282
Installing Windows XP on the Intel based dvx500t Series
[
This guide is confirmed to work for the HP dv6500 and dv9500 series. I have received inconsistent results from dv2500 users.
It is also confirmed that this wont work for dv2700 laptops. Still waiting on results.
Confirmed working for dv6700 and dv9700 series. Please see user therulebookman for more info.
No word on the HDX series.
Here is the thread confirming XP doesnt work for dv2700:
http://forum.notebookreview.com/showthread.php?t=214395
This guide is NOT for laptops with the AMD CPU. These drivers will NOT work and PLEASE dont install the intel chipset on your AMD laptops! thanks.
use this guide instead: http://forum.notebookreview.com/showthread.php?t=200763
This guide is continuously updated and changing due to different variables. The main part of this guide is the same though.
Get the latest drivers from here:
http://www.megaupload.com/?d=6R56CI5E
These drivers were provided and uploaded by mujjuman on 12/07.
A HUGE THANKS to Hackez for providing me with lots of help with starting the DriverPacks and help with the guide.
Hackez started the first major DriverPacks and also updated them periodically, before handing over the reins to me.
NOTICE: Users of all laptops should read all model-specific notes. This guide was made primarily for dv9500 and dv6500. But it
also works for dv6000 and dv9000, and for dv6700 and dv9700. IT DOES NOT WORK ON dv2700. It works on dv2500 but you have to read some extra posts (quoted
below). Thank you.
Please use 7-Zip, PowerArchiver, or WinRAR to extract the Driver Pack and then burn it to a disk or use a flash drive.
-------------------------------------------------
dv2500 owners, read this:
For dv6000 and dv9000 users:
Check out Robvia's guide. His guide is more specific to your models, but this guide works fine too.
The only problem with this guide working on your laptops is:
1. DO NOT INSTALL THIS SATA DRIVER. Download all your drivers from the hp website. They provide it for you.
2. Instead, disable Native SATA support in your BIOS, and proceed to install XP.
3. Install all your drivers, including your SATA drivers (ICH7M) and enable Native SATA support in your BIOS.
4. Thank Robvia.
For dv6500t and dv9500t users:
Just Proceed. Only problem I can see happening is the user forgetting to install UAA before Realtek drivers and the nVidia drivers not working right (in that case, use the old drivers)
For dv6700 and dv9700 users:
Please read the following post:
Download your drivers using the link above ^
I dont know 100% if my drivers will work for you, so use therulebookman's.
I dont see why it wouldnt work though. But I have to research more on that.
-------------------------------------
Note: This guide was created using a dv9500t with a Core 2 Duo Processor and a Nvidia Graphics Card. Please note if you have a different laptop or a different hardware configuration your results may vary.
This guide was made due to the fact that:
• The HP BIOS for the dv2500/dv6500/dv9500 series lacks the option to disable SATA Support, so Windows XP will not recognize the harddrive without
following the special procedures explained below.
• It was difficult for us (mujjuman and Hackez) to obtain Windows XP Drivers, so Hackez has included them in one location to make it easier for everyone.
• The folks at Notebookreview.com asked me to
For dv2500 owners, this guide MAY or MAY NOT work…. due to the fact that hardware varies between laptops.
Here are my dv9500t specifications so you can compare what is different between our laptops hardware wise. This is very important when installing
necessary drivers because some drivers may not work if you have different hardware.
Core 2 Duo T7300 (2.0GHz 4MB Cache)
2GB Of RAM
160GB Hard Drive
8x Superdrive (Without Lightscribe)
HP Webcam
Intel Wireless with Bluetooth
Nvidia 8400M GS
Realtek High Definition Sound Card
5-1 Media Card Reader
• Those who have Integrated Intel Graphics have the Mobile Intel® GM965 Express Chipset.
• Those who have the Nvidia Graphics have the Mobile Intel® PM965 Express Chipset.
Now some things to do before we begin:
1. Obtain 3 DVDs (or 1 DVD-Dual Layer)
2. Burn the Recovery Disks, they are extremely important! I am aware they are a Vista Backup, but please burn the recovery disks. It will take 3 (three)
4.37GB DVD-R or 1 (one) Dual-Layer DVD-R. I used the single layer DVDs. You will have to burn the recovery disks because installing Windows XP will
render the recovery partition useless. I found that out the hard way. So Please Do It.
3. Having a high capacity flash drive (1GB or more) is really useful. This isn’t necessary, but it will save time as well as money from using additional
discs. Navigate to the C: Drive and save the Swsetup folder to a disc or flash drive. Also, download and extract contents of the DriverPack to a folder
on the flash drive.
4. Save any documents, pictures, and files you may have stored and want to keep. I didn’t have anything to save and backup because I didn’t use Vista for
more than a few days.
On the Road to Windows XP (Slipstreaming SATA drivers and SP2):
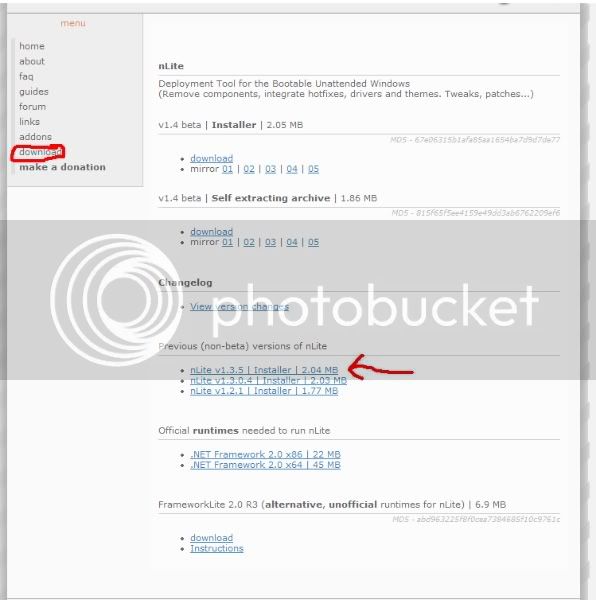
1. Go to http://www.nliteos.com/download.html and download the latest non-beta release. After the downloading is complete, install the
program. Restart if necessary and if prompted to download any Framework, do so.
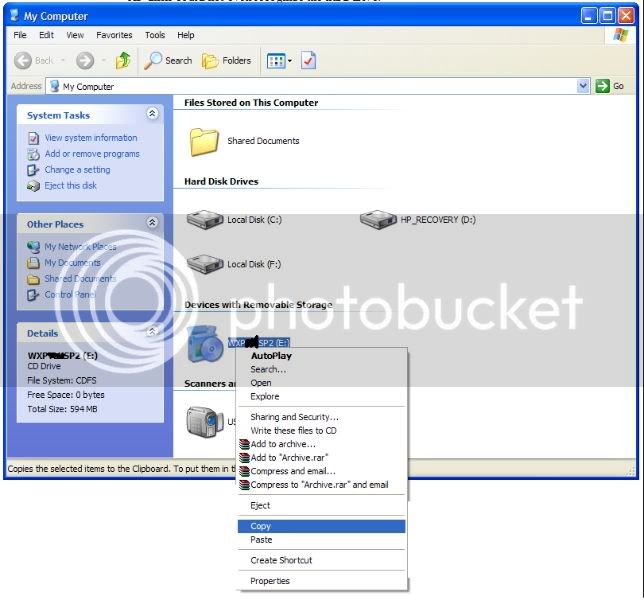
2. Insert your Windows XP CD and copy all of its content into a new folder on your Desktop. The easiest way to do this is to right-click the drive
after you have inserted the disk, click copy and paste it to the desktop. Doing so will automatically create a new folder on your desktop with the CD's
content.
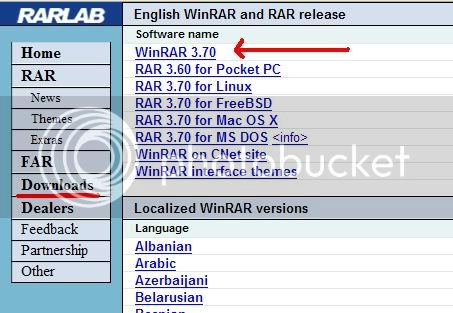
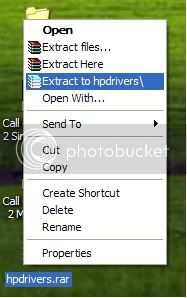
3. If you haven’t done so already, download the drivers that Hackez uploaded. Download and install WinRAR or 7-Zip from www.rarlabs.com[/http 7-Zip is found at [url]http://www.7-zip.org/
4. Extract the drivers from the file you downloaded. Take note of the SATA folder")
5. Download Service Pack 2 Network Install (Full Version) from Microsoft. (This is only if you don't have a Windows XP SP2 CD)
6. Once everything is downloaded, open nLite and click next. The second screen will ask you to browse to the location where your Windows XP is located.
(This is wherever you extracted your CD Contents to)

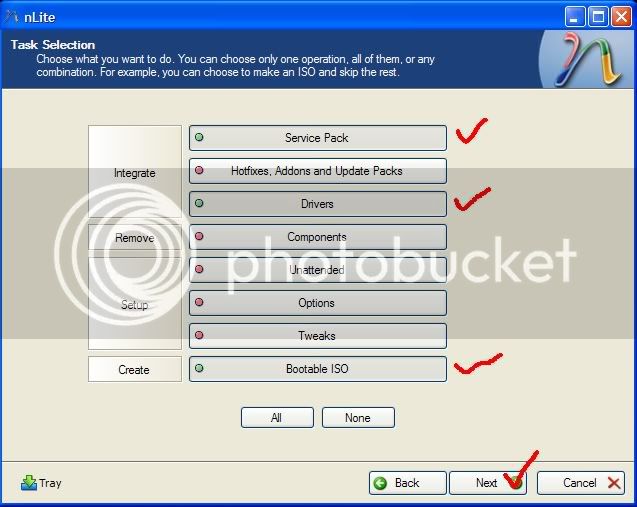
7. Keep clicking next until you reach the following screen. Click on Service Pack (If you are Slipstreaming SP2), Drivers, and Bootable ISO. Click
Next.
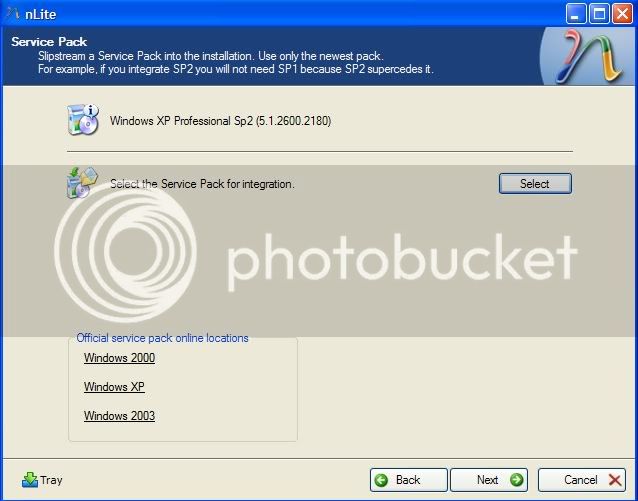
8. Choose the Service Pack you downloaded, click next and let it install.
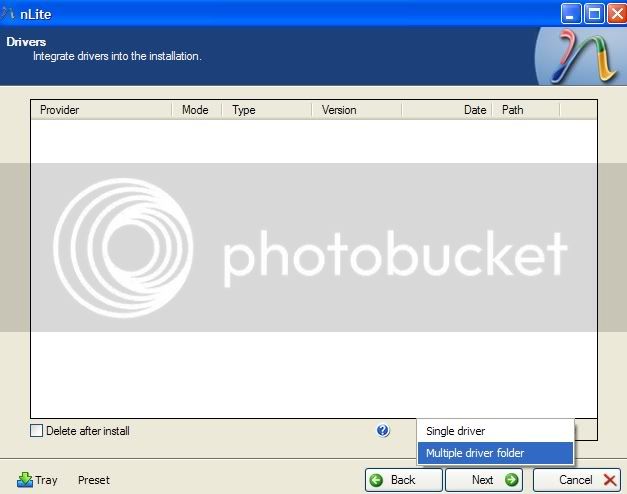
9. Now on to slipstreaming the SATA driver. Click on insert, and then select multiple driver folder.
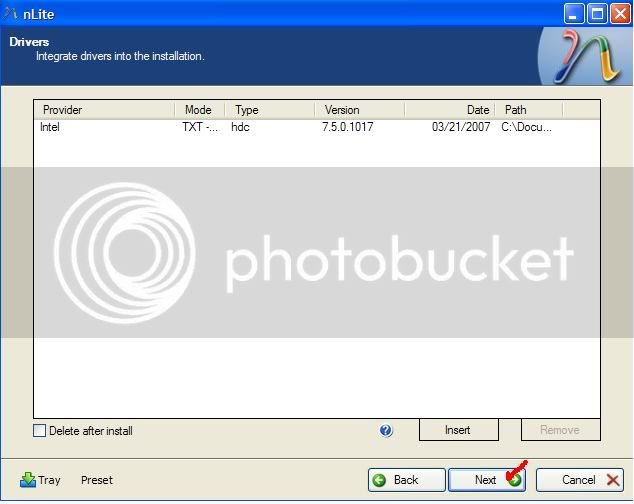
10. Choose the folder again, click OK. Choose the (Mobile ICH8M-E/M) driver, click Next.

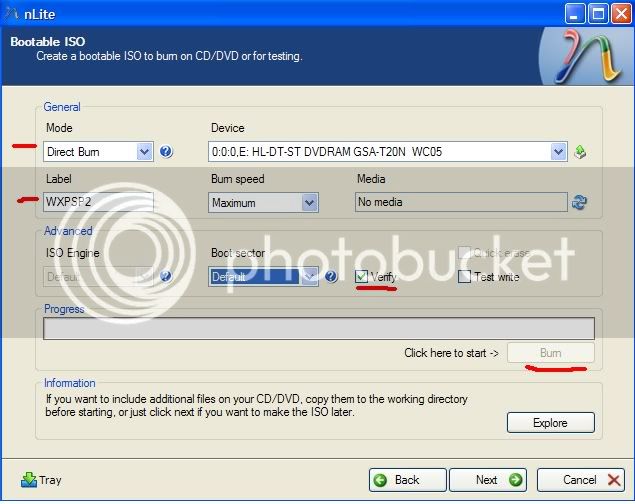
11. Now its time to burn your newly created Windows XP CD. I find it easier to do a Direct Burn. Title the CD as you see fit, as long as you will know
its your Slipstreamed Windows XP CD. (ex. "WXPSP2") Click on “Verify” to be safe and then click burn.
12. Now you are Finished!
Checklist: Before Installing Windows XP:
1. Make sure that you burned the recovery disks.
2. Make sure that you saved your documents, work, pictures, game data etc.
3. Make sure to download and save the WinRAR setup file from www.rarlabs.com[/http (Or the 7-Zip setup file from [url]www.7-Zip.org) This is
because the drivers posted are in 7-Zip format, and you won’t be able to go on the internet and download it once you install Windows XP.
4. Save the drivers that you downloaded on a flash drive or CD!
5. Please make you have downloaded and installed Everest and cpuid while you are still in Vista. Note down your exact hardware specs. It is easier if you
take a screenshot, and save it along with your work and drivers. This is incase the drivers here dont work, and you need to find your own drivers because
your hardware is different. It is very very important, so that you dont have to go back to Vista to get your hardware specs, and you dont have to go nuts
in XP with non-functioning hardware, and you dont have to mess up your computer installing and trying out different drivers.
Installing Windows XP:
1. This part of the guide is pretty straightforward. Boot from the Windows XP CD you just finished creating. Lets hope the SATA drivers are properly
integrated.
2. On the screen where it asks you to choose a partition to install, you have quite a few options. Once we install XP, the recovery partition is rendered
useless anyway, so be sure to delete that partition. You can install Windows XP on a single partition or modify your partitions as you see fit.
3. This is what I did: I deleted all partitions, and created three new partitions and formatted the first two to NTFS. The primary partition is 136GB,
the secondary partition is 10.7GB. I created 1 more partition with the remaining space (about 1.1GB) but I didn't format it. The smallest partition that
i created is for the Quickplay Directplay partition. I have not installed yet however.
4. Continue to install Windows XP and follow the on-screen prompts for setup information..
5. Reboot and Enjoy!!!! You will automatically notice how much faster Windows XP is than Windows Vista on the same hardware. At least I know that I
noticed.
-------------------------------------------
Coming up: installing drivers.
-------------------------------------------
ok, this is my THIRD ATTEMPT on trying to post the final part to this guide.... oh God please let this work and please do not let my
computer crash.
--------------
a very very very BIG THANKS to Hackez for your help on this guide and your support to me and to all those who post for help on this
thread. also a very BIG thanks for posting regular driver updates. THANK YOU!!!!!!!! and thank you for your patience. i know
i have been really bad at updating.
thank you to everyone who have been waiting and sorry for keeping you waiting too long. thanks for everyone's support.
---------------
Please Note:
The following screenshots were taken before the driver updates and when these were the only drivers available. After these screenshots have been taken,
Hackez provided many new driver updates periodically and the setup screens and filenames may have changed. Since then, I have updated the pack as well.
If you have any problems, please DO NOT PM mujjuman or Hackez, instead, post the question in this thread. Thanks. This is due to numerous amounts
of PMs and emails ive been getting about installing XP on specific laptops from Greece and Israel, etc. .... sorry.
Thanks
---------------
Installing Drivers on Windows XP:
1. Now the fun part begins, for some people this may be the most difficult part. When you first boot into Windows, change your resolution to your LCD's Native Resolution.
2. If you open My Computer, the USB Camera is already installed. (This will only occur if you use a Windows XP SP2 CD to install Windows, if the USB
Camera is already installed skip the step to install the USB Camera Drivers)
3. Check the device manager after completing driver installations. I just provided pictures of what it should look like. You don’t really have to
check it, but I typed “mandatory” when you need to check it. This is just so you know that you are installing the drivers correctly and your
hardware is being detected.
4. First thing you should do is to install the chipset drivers, then reboot. Check device manager.
5. Install the Intel Matrix Storage Manager Drivers, then reboot.
6. Install the Graphics Driver. Click “Continue Anyway” if a dialog box warns you that the driver is unsigned.
7. Reboot and check Display Properties to make sure that your card is properly listed. Check device manager.
8. Install the Realtek drivers. Start with “RTL8169…” first, then install “RTL8168…” Notice the LAN icon in the system tray. Open up “Network
Connections” and you will see the LAN icon there as well. Reboot and check device manager.
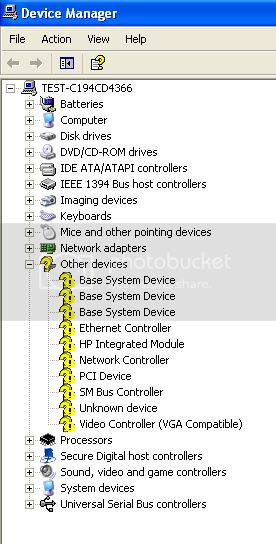
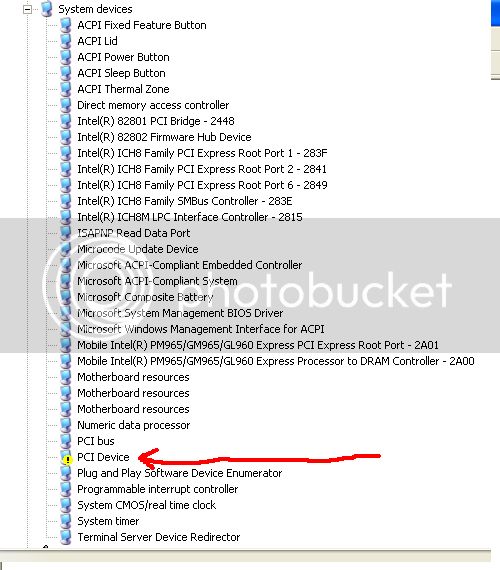
9. Install the UAA Driver and Reboot. Check device manager (this one is mandatory) and notice that PCI Device has a “!” next to it. We will take
care of that later.
10. Install the WDM Drivers. These are the sound drivers. Reboot. You might not have sound right away, this is ok.
11. Install the modem drivers. You might get an error saying that drivers are already installed. This is ok as well.
12. Install the synaptics driver but DON’T reboot. Install the Quicklaunch driver. You might get a bunch of “New Hardware Found” Wizards. Just choose
one and make sure you click “No” then click next. Choose “Automatic” then click “Finish”. Reboot. NOTE: If you ever plan to install
QuickPlay DirectPlay, do not touch the quickplay button on the quicklaunch keyboard.
13. Check device manager. Install the wireless drivers. Notice that there is a new wireless network found (if you have a wireless network nearby)
14. Install the Bluetooth drivers. You might get an error message. That is ok, just continue the installation.
15. Install the hp wireless assistant. This is so you can individually control the wireless card and the Bluetooth card. Reboot.
16. Before you can start using Bluetooth and sound, you will need to open device manager (mandatory). Click on hp intergrated module, and
update driver.
17. Click “no”, then choose Automatic on the next page, then click finish. Reboot.
18. Check device manager, and install the webcam drivers (even though a webcam is already detected and installed.)
19. Open the device manager (mandatory) and find that “PCI Device” listed under “System”. Update the driver.
20. UAA will automatically be reinstalled, and so will the modem drivers. Please reboot.
21. You will notice that you now have sound!
22. Install the Ricoh Reader drivers, reboot.
23. The following is optional… Open windows explorer to your Windows directory, and delete the contents of the Prefetch folder.
24. Install Windows Updates, all your programs, etc.
25. Delete Prefetch contents again.
26. Reboot.
27. Enjoy!!!!!!
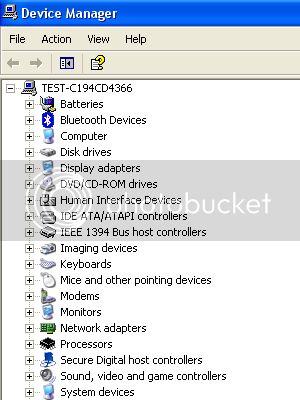
28. This is how your device manager should look like in the end:
FINAL NOTE:
I understand that these steps might be outdated since the new DriverPacks. Follow the directions in the Readme from the DriverPack for more specificity.
----------------
Also, there is an EXCELLENT guide on dual-booting as well. the XP Installation steps are very similar.
http://www.nogodforme.com/HPDV6500T.htm
Installing Windows XP on the dvx500t Series.
This guide is confirmed to work for the HP dv6500 and dv9500 series. I have received inconsistent results from dv2500 users.
It is also confirmed that this wont work for dv2700 laptops. Still waiting on results.
Confirmed working for dv6700 and dv9700 series. Please see user therulebookman for more info.
No word on the HDX series.
Here is the thread confirming XP doesnt work for dv2700:
http://forum.notebookreview.com/showthread.php?t=214395
This guide is NOT for laptops with the AMD CPU. These drivers will NOT work and PLEASE dont install the intel chipset on your AMD laptops! thanks.
use this guide instead: http://forum.notebookreview.com/showthread.php?t=200763
This guide is continuously updated and changing due to different variables. The main part of this guide is the same though.
Get the latest drivers from here:
http://www.megaupload.com/?d=6R56CI5E
These drivers were provided and uploaded by mujjuman on 12/07.
A HUGE THANKS to Hackez for providing me with lots of help with starting the DriverPacks and help with the guide.
Hackez started the first major DriverPacks and also updated them periodically, before handing over the reins to me.
NOTICE: Users of all laptops should read all model-specific notes. This guide was made primarily for dv9500 and dv6500. But it
also works for dv6000 and dv9000, and for dv6700 and dv9700. IT DOES NOT WORK ON dv2700. It works on dv2500 but you have to read some extra posts (quoted
below). Thank you.
Please use 7-Zip, PowerArchiver, or WinRAR to extract the Driver Pack and then burn it to a disk or use a flash drive.
-------------------------------------------------
dv2500 owners, read this:
For dv6000 and dv9000 users:
Check out Robvia's guide. His guide is more specific to your models, but this guide works fine too.
The only problem with this guide working on your laptops is:
1. DO NOT INSTALL THIS SATA DRIVER. Download all your drivers from the hp website. They provide it for you.
2. Instead, disable Native SATA support in your BIOS, and proceed to install XP.
3. Install all your drivers, including your SATA drivers (ICH7M) and enable Native SATA support in your BIOS.
4. Thank Robvia.
For dv6500t and dv9500t users:
Just Proceed. Only problem I can see happening is the user forgetting to install UAA before Realtek drivers and the nVidia drivers not working right (in that case, use the old drivers)
For dv6700 and dv9700 users:
Please read the following post:
Download your drivers using the link above ^
I dont know 100% if my drivers will work for you, so use therulebookman's.
I dont see why it wouldnt work though. But I have to research more on that.
-------------------------------------
Installing Windows XP on a hp dv6500t/dv9500t Series Laptop
Note: This guide was created using a dv9500t with a Core 2 Duo Processor and a Nvidia Graphics Card. Please note if you have a different laptop or a different hardware configuration your results may vary.
This guide was made due to the fact that:
• The HP BIOS for the dv2500/dv6500/dv9500 series lacks the option to disable SATA Support, so Windows XP will not recognize the harddrive without
following the special procedures explained below.
• It was difficult for us (mujjuman and Hackez) to obtain Windows XP Drivers, so Hackez has included them in one location to make it easier for everyone.
• The folks at Notebookreview.com asked me to
For dv2500 owners, this guide MAY or MAY NOT work…. due to the fact that hardware varies between laptops.
Here are my dv9500t specifications so you can compare what is different between our laptops hardware wise. This is very important when installing
necessary drivers because some drivers may not work if you have different hardware.
Core 2 Duo T7300 (2.0GHz 4MB Cache)
2GB Of RAM
160GB Hard Drive
8x Superdrive (Without Lightscribe)
HP Webcam
Intel Wireless with Bluetooth
Nvidia 8400M GS
Realtek High Definition Sound Card
5-1 Media Card Reader
• Those who have Integrated Intel Graphics have the Mobile Intel® GM965 Express Chipset.
• Those who have the Nvidia Graphics have the Mobile Intel® PM965 Express Chipset.
Now some things to do before we begin:
1. Obtain 3 DVDs (or 1 DVD-Dual Layer)
2. Burn the Recovery Disks, they are extremely important! I am aware they are a Vista Backup, but please burn the recovery disks. It will take 3 (three)
4.37GB DVD-R or 1 (one) Dual-Layer DVD-R. I used the single layer DVDs. You will have to burn the recovery disks because installing Windows XP will
render the recovery partition useless. I found that out the hard way. So Please Do It.
3. Having a high capacity flash drive (1GB or more) is really useful. This isn’t necessary, but it will save time as well as money from using additional
discs. Navigate to the C: Drive and save the Swsetup folder to a disc or flash drive. Also, download and extract contents of the DriverPack to a folder
on the flash drive.
4. Save any documents, pictures, and files you may have stored and want to keep. I didn’t have anything to save and backup because I didn’t use Vista for
more than a few days.
On the Road to Windows XP (Slipstreaming SATA drivers and SP2):
1. Go to http://www.nliteos.com/download.html and download the latest non-beta release. After the downloading is complete, install the
program. Restart if necessary and if prompted to download any Framework, do so.
2. Insert your Windows XP CD and copy all of its content into a new folder on your Desktop. The easiest way to do this is to right-click the drive
after you have inserted the disk, click copy and paste it to the desktop. Doing so will automatically create a new folder on your desktop with the CD's
content.
3. If you haven’t done so already, download the drivers that Hackez uploaded. Download and install WinRAR or 7-Zip from www.rarlabs.com[/http 7-Zip is found at [url]http://www.7-zip.org/
4. Extract the drivers from the file you downloaded. Take note of the SATA folder
5. Download Service Pack 2 Network Install (Full Version) from Microsoft. (This is only if you don't have a Windows XP SP2 CD)
6. Once everything is downloaded, open nLite and click next. The second screen will ask you to browse to the location where your Windows XP is located.
(This is wherever you extracted your CD Contents to)
7. Keep clicking next until you reach the following screen. Click on Service Pack (If you are Slipstreaming SP2), Drivers, and Bootable ISO. Click
Next.
8. Choose the Service Pack you downloaded, click next and let it install.
9. Now on to slipstreaming the SATA driver. Click on insert, and then select multiple driver folder.
10. Choose the folder again, click OK. Choose the (Mobile ICH8M-E/M) driver, click Next.
11. Now its time to burn your newly created Windows XP CD. I find it easier to do a Direct Burn. Title the CD as you see fit, as long as you will know
its your Slipstreamed Windows XP CD. (ex. "WXPSP2") Click on “Verify” to be safe and then click burn.
12. Now you are Finished!
Checklist: Before Installing Windows XP:
1. Make sure that you burned the recovery disks.
2. Make sure that you saved your documents, work, pictures, game data etc.
3. Make sure to download and save the WinRAR setup file from www.rarlabs.com[/http (Or the 7-Zip setup file from [url]www.7-Zip.org) This is
because the drivers posted are in 7-Zip format, and you won’t be able to go on the internet and download it once you install Windows XP.
4. Save the drivers that you downloaded on a flash drive or CD!
5. Please make you have downloaded and installed Everest and cpuid while you are still in Vista. Note down your exact hardware specs. It is easier if you
take a screenshot, and save it along with your work and drivers. This is incase the drivers here dont work, and you need to find your own drivers because
your hardware is different. It is very very important, so that you dont have to go back to Vista to get your hardware specs, and you dont have to go nuts
in XP with non-functioning hardware, and you dont have to mess up your computer installing and trying out different drivers.
Installing Windows XP:
1. This part of the guide is pretty straightforward. Boot from the Windows XP CD you just finished creating. Lets hope the SATA drivers are properly
integrated.
2. On the screen where it asks you to choose a partition to install, you have quite a few options. Once we install XP, the recovery partition is rendered
useless anyway, so be sure to delete that partition. You can install Windows XP on a single partition or modify your partitions as you see fit.
3. This is what I did: I deleted all partitions, and created three new partitions and formatted the first two to NTFS. The primary partition is 136GB,
the secondary partition is 10.7GB. I created 1 more partition with the remaining space (about 1.1GB) but I didn't format it. The smallest partition that
i created is for the Quickplay Directplay partition. I have not installed yet however.
4. Continue to install Windows XP and follow the on-screen prompts for setup information..
5. Reboot and Enjoy!!!! You will automatically notice how much faster Windows XP is than Windows Vista on the same hardware. At least I know that I
noticed.
-------------------------------------------
Coming up: installing drivers.
-------------------------------------------
ok, this is my THIRD ATTEMPT on trying to post the final part to this guide.... oh God please let this work and please do not let my
computer crash.
--------------
a very very very BIG THANKS to Hackez for your help on this guide and your support to me and to all those who post for help on this
thread. also a very BIG thanks for posting regular driver updates. THANK YOU!!!!!!!! and thank you for your patience. i know
i have been really bad at updating.
thank you to everyone who have been waiting and sorry for keeping you waiting too long. thanks for everyone's support.
---------------
Please Note:
The following screenshots were taken before the driver updates and when these were the only drivers available. After these screenshots have been taken,
Hackez provided many new driver updates periodically and the setup screens and filenames may have changed. Since then, I have updated the pack as well.
If you have any problems, please DO NOT PM mujjuman or Hackez, instead, post the question in this thread. Thanks. This is due to numerous amounts
of PMs and emails ive been getting about installing XP on specific laptops from Greece and Israel, etc. .... sorry.
Thanks
---------------
Installing Drivers on Windows XP:
1. Now the fun part begins, for some people this may be the most difficult part. When you first boot into Windows, change your resolution to your LCD's Native Resolution.
2. If you open My Computer, the USB Camera is already installed. (This will only occur if you use a Windows XP SP2 CD to install Windows, if the USB
Camera is already installed skip the step to install the USB Camera Drivers)
3. Check the device manager after completing driver installations. I just provided pictures of what it should look like. You don’t really have to
check it, but I typed “mandatory” when you need to check it. This is just so you know that you are installing the drivers correctly and your
hardware is being detected.
4. First thing you should do is to install the chipset drivers, then reboot. Check device manager.
5. Install the Intel Matrix Storage Manager Drivers, then reboot.
6. Install the Graphics Driver. Click “Continue Anyway” if a dialog box warns you that the driver is unsigned.
7. Reboot and check Display Properties to make sure that your card is properly listed. Check device manager.
8. Install the Realtek drivers. Start with “RTL8169…” first, then install “RTL8168…” Notice the LAN icon in the system tray. Open up “Network
Connections” and you will see the LAN icon there as well. Reboot and check device manager.
9. Install the UAA Driver and Reboot. Check device manager (this one is mandatory) and notice that PCI Device has a “!” next to it. We will take
care of that later.
10. Install the WDM Drivers. These are the sound drivers. Reboot. You might not have sound right away, this is ok.
11. Install the modem drivers. You might get an error saying that drivers are already installed. This is ok as well.
12. Install the synaptics driver but DON’T reboot. Install the Quicklaunch driver. You might get a bunch of “New Hardware Found” Wizards. Just choose
one and make sure you click “No” then click next. Choose “Automatic” then click “Finish”. Reboot. NOTE: If you ever plan to install
QuickPlay DirectPlay, do not touch the quickplay button on the quicklaunch keyboard.
13. Check device manager. Install the wireless drivers. Notice that there is a new wireless network found (if you have a wireless network nearby)
14. Install the Bluetooth drivers. You might get an error message. That is ok, just continue the installation.
15. Install the hp wireless assistant. This is so you can individually control the wireless card and the Bluetooth card. Reboot.
16. Before you can start using Bluetooth and sound, you will need to open device manager (mandatory). Click on hp intergrated module, and
update driver.
17. Click “no”, then choose Automatic on the next page, then click finish. Reboot.
18. Check device manager, and install the webcam drivers (even though a webcam is already detected and installed.)
19. Open the device manager (mandatory) and find that “PCI Device” listed under “System”. Update the driver.
20. UAA will automatically be reinstalled, and so will the modem drivers. Please reboot.
21. You will notice that you now have sound!
22. Install the Ricoh Reader drivers, reboot.
23. The following is optional… Open windows explorer to your Windows directory, and delete the contents of the Prefetch folder.
24. Install Windows Updates, all your programs, etc.
25. Delete Prefetch contents again.
26. Reboot.
27. Enjoy!!!!!!
28. This is how your device manager should look like in the end:
FINAL NOTE:
I understand that these steps might be outdated since the new DriverPacks. Follow the directions in the Readme from the DriverPack for more specificity.
----------------
Also, there is an EXCELLENT guide on dual-booting as well. the XP Installation steps are very similar.
http://www.nogodforme.com/HPDV6500T.htm